Showing posts with label DIY. Show all posts

April 09, 2013

DIY REVAMP OLD TARNISHED RINGS

I have a set of 3 pyramid style rings that I really love. I got them at Forever 21 and probably only paid 3 bucks for them, but they turned green after just a few wears! I got to thinking about how I could still wear these rings without having the gross green bronze color showing when I wear them, and leaving residue on my finger. Cue this idea!
All you need is some old rings, your favorite color polishes, and a top coat! Here's what you do: 1. paint your rings a layer at a time, laying on the cloth napkin to dry in between coats. 2. Paint until you achieve your desired color (mine took 3-4) coats for each color. 3. Once the final coat is dry, add your top coat and allow to dry for at least 30 minutes before wearing. That's it! Super simple, but such an easy way to give old rings a new life. 
Be sure to take your rings off before wetting/washing your hands because I am sure over time it will wear down the paint.  Bonus: this is so quick and simple  that you could easily remove the paint with polish remover and paint a new color on. The possibilities  are  endless! Have fun! Also, this is a messy project, see my fingers below.

February 21, 2013

CHEAP + EASY LYRICAL ART

We're in the process of redoing a few rooms in our house. And while I want to incorporate special pieces from talented artists, it can really start to add up in cost. In comes this DIY. I feel silly calling this a DIY. It's so super simple that it's really more of an idea. But I don't think that there is someone out there pointing fingers at people calling things DIY's that aren't so....i think I'll call this that. When I say "cheap," I mean that it cost me less than 5 dollars to create multiple pieces. It's a super easy and affordable way to add some "filler art" to your wall. 

1.// Pick a favorite lyric (or quote!) and type it out in photoshop. You could also use paint if you don't have photoshop. It is important that you create your blank image in inches not pixels. If you want a large amount of white space around your image (I did on one of mine so I could paint a border around it) be sure to save the file smaller than the size of your frame. If not they will print your image to fill the size that you saved it. 2.// Save the files and take them to Staples to have them printed. I printed mine on cardstock in their thickest option and in matte. They'll print it on an 11 x 17 sheet. If you're frame isn't this big, have them trim it down to size, or you can do it yourself at home. 3.// Now it's time to paint! This part is totally up to you. On one of my prints I chose to paint a little olive wreath. On another I painted a simple Aztec inspired design. I really want to do polka dots next! 4.// After your work has dried, frame and enjoy!! 
A few tips to consider:  --You don't have to limit yourself to only words! I used a picture I took of a field and added text to it. Then printed it in black and white and painted on it. --I got my frames at the Dollar Tree. They are 11 x 14 in size and perfect for this project!  
Let me know if you make some painted prints for your home! I'd love to see.

May 12, 2012

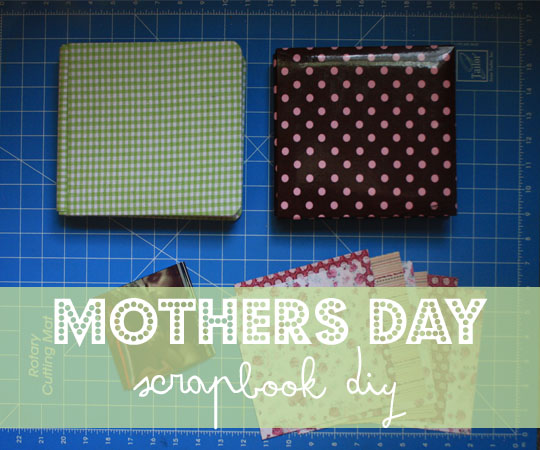
Mother's Day Scrapbook DIY!

Mother's Day has always been fun + special, and since becoming a Mother it's only meant more to me. This year I had plans to do this DIY from A Beautiful Mess. I bought all the supplies, printed 100 Instagram photos (at .50 cents a piece--yikes!) and it didn't cross my mind that I might not be able to find the binding adhesive. I was walking around Hobby Lobby on the verge of tears not knowing what I was going to do. I somehow wandered to the scrapbook isle and found two cute 6 x 6 printed/fabric scrapbooks, for 40% off! And idea was born!
*The screwdriver and rotary cutter are optional. I used the screwdriver to take the screws out of the book and add more pages (my book only came with 20) The rotary cutter makes it easier to cut the pages on a grided mat and is more steady than a hand and scissors. 

Steps: 1. Collect scrapbook pages in coordinating colors + designs. Since these are for our Moms, I went with a pink/green/beige pallet in dainty patterns, pretty floral prints and Victorian designs. 2. Cut your pages down to the size of your scrapbook page inserts. And easy way to do this is just take out the white liner inside and use that as a guide. While you're at it, go ahead and take out all of the white liners! You don't need them. (This would be a great thing for your fella to do! I had Bean take all of ours out) 3. Arrange your scrapbook pages in whatever way you prefer and start sliding them in the book! 4. After you've got your pages the way you want them, add your pictures! One piece of double-sided tape will be plenty for the plain pages. If you get glittery pages (like I did) you'll need a few pieces of tape to make it stick. 5. Be sure to add touches of you + your family! For Each Mom's book I used some washi tape along the pictures edges. I added little lists of our favorite things about them from my Smash Pads. I doodled frames around some of the pictures, and I wrote some remarks and inside jokes on some of them.
I am so happy with how these turned out, and I'm already anticipating making another! I think this would be the perfect graduation gift too! (I'll go browse my cousin's instagram for pictures, since he's graduating in a few weeks!) Handmade presents mean so much more, especially ones with sentimental pieces like pictures of our little family over the past two years.

What have you made/gotten for your Mama for mothers day? I'd love to see! xo, Meghan


April 25, 2012

Wedding Project: Groomsman? DIY

It's only here recently, like the past two weeks, that Bean and I have actually done wedding planning. We booked our dream location a few months ago, but hadn't done much planning outside of that. Fast forward to last week. Someone lit a fire inside us because, seriously, we have gotten so much done in these past few weeks! One thing on our to do lists were to ask my 'maids (check) and ask the groomsmen. I obviously put a lot of thought into asking my bridesmaids, but we hadn't put much thought into asking the groomsmen to be groomsmen. Bean planned a little trip with all of the guys to a rodeo on Friday night, but that was pretty much it. On Thursday night  I had a change of heart! I didn't want to boys to be left out! And really, more than anything, I wanted them to read + see what they should be looking like during the wedding. I called Bean (probably a little too excited) and told him about my idea, and he liked it too! Here is how I did it:
I asked Bean to bring home big envelopes with prongs, but they didn't have those at his work, so he brought back huge heavy duty zip block bags. At first I really thought this was silly, and I wouldn't be able to use them, but they turned out to be one of the best parts of it all. (If you want to put a lot of effort into asking your groomsman, but don't want them knowing you tried hard...put all of your goodies in zip block bags, it looks a little less neat!) 
One.  I printed out pictures from my 'Wedding Swoon' board on Pinterest that captured the look/attire of the day  rom the boys perspective. Two. I hit up Michaels Friday morning, for a few things to add to the bag that captured the feel of our wedding. Three + Four. I got these alphabet stickers that had a old world circus/carnival feel with the letters and colors. I got some card stock in the colors of our wedding; colors that the boys should be on the look out for, for their bowties. Five. I picked up some cards with tight ropers on the front that say 'Be Daring' and hand stamped what they should wear on the inside. I wanted the bag to be fun, too though, because the boys were having a night out at the rodeo. Six. So I got some different candies, including some caramel something called "Squirrels Nut Zippers." I thought I was so hilarious, and that they'd all think I was so awesome for finding those. hah.  Seven. The final thing I needed to get were some cigars. I was getting them honestly more for the novelty of having them in the bag, rather than thinking they'd actually smoke them. 
Well two funny things happened all because of these cigars...The first thing was actually more embarrassing. I'm obviously old enough to buy them, but having never bought anything because of my age before...I had no idea what I was looking for. I went in there sounding like a novice asking for "some cigars." Any other day would have been a-okay but as I was checking out, and sounding retarted asking for them, the guy behind me made the comment "oh, getting those for 4/20 eh?" HOW EMBARASSING. I honestly didn't even recognize the date. (And lets don't pretend that we don't know what it is...because we all do!) I had Dakota on my hip, and suddenly I felt like a pot smoking mother. Which I am not, by any means!! The other funny thing is that Bean has never once done anything "drinking/smoking/drug" related. So naturally, I assumed he would think the cigars were funny, but a waste of 4 bucks because he wouldn't be doing anything with them. Well, I was wrong! Him and the boys all smoked their cigars after the rodeo! 
If you plan on doing something similar, just know that boys don't need much. A few candies, something fun (lottery tickets or scratch offs would be cute too!) and a few visuals. All in all, these bags cost us like 10$ or less, for all 5 of them. It took me only an hour to get everything together. The hardest part was stamping every card with what they should wear, but you could just as easily write it instead of stamp it. You can make these super simple like we did, or really dress them up + include something fun like a tiny bottle of your favorite liquor or a fun camera! All in all, the bags were a hit and I'm so glad we made them! 

If you make them, I'd love to see!

xo, Meghan

April 10, 2012

Askin' my maids!

Although I have been rather silent lately about our wedding planning, the plans are in full swing around these parts! Sometimes it's so excited, and sometimes it's super terrifying thinking of all that I still have left to do! Maybe some seasoned wedding planners, or freshly married brides, will stumble along this post and offer some advice to me.
On my ever growing list of 'to-dos' has been a clever way to ask my bridesmaids to, well, be my bridesmaids. side note: I have very few close friends, (woe is me!) and only a few girl relatives, so coming up with the 4 bridesmaids I did was a feat in itself. It makes these boxes look like a  piece of cake!  I wanted it to be special, encompass the overall feel of our wedding, and be handmade. So naturally, when I saw this DIY right before we got engaged and couldn't shake it from my mind. I knew I wanted to ask my own bridesmaids this very way! 
When I found these boxes at Hobby Lobby, I thought they would be perfect for what I was trying to achieve, not to mention they were 40% off already! They were just plain cardboard, so I wanted to paint them a color from our wedding. -- Something you should know about me, and is very prominent in the creating of these boxes....I am terribly impatient. -- So, I bought these boxes and a tube of Martha Stewart paint in buttermilk yellow and set off to painting. After two coats looking like I had barely even painted, I gave up and told Bean to spray paint them. At 10 o'clock that night. Bless his little heart, he did, but since it was so dark and we only have a very tiny porch light, there were a few runs. I tried to spray paint over them, but well, you can see they are still there. Handmade imperfections are the best right?! (At least that's what I'm trying to sell! ;) Also, since I'm putting it all out there, and should you choose to do this for your one day wedding; I would like to politely suggest that you buy the wooden boxes. If you choose to paint them, or not because they are charming in the light wood!, the whole look will be a lot more pretty, put together and smooth. My impatientness took over here too, because instead of coming back a few different times, with individual coupons + wooden boxes, I needed to have the boxes right away. So I settled for these.
After the boxes were finished, I set out to collecting, making, and printing the contents. This was the fun part! I picked up paint chips in our wedding colors. I printed pictures from my pinterest board that showed the theme of our wedding. I added random instax pictures of Bean + I to the boxes from different times in our relationship. I made little flags, resembling these just because! I typed up little info cards, just like she did, because I wanted the bridesmaids to know what the day was going to be about, what they should expect, and how important they are to me! My favorite part of the boxes though, are the matching hankies that I found on my trip to Thomasville. I also really love these cards that I got at a local bookstore, in Thomasville as well.

 The boxes were complete on the inside, all I needed to do was add something to the lids. I picked out a few of  favorite fancy scrapbook papers at Hobby Lobby, ones that reminded me of our theme, and mod podged them to the tops of the lids. As far as the inside, I planned on writing "Be My Maid" or something like that on the inside, but when I opened up the boxes and saw the plain brown cardboard I had a much better idea! I painted the insides with the same color as the outsides, again, feverishly because I knew it was going to be covered up. I wrote the names of the girls on paper doilies and mod podged them to the inside just around the center.
I am SO happy with this project and the way they turned out. I've had them sitting basically finished in my craft room for going on two months, and it wasn't until last night that I took the time to type out the info and really complete the boxes. I sure hope that all my other wedding crafts don't take me as long as these did! I don't think they will though, because I made it mandatory that every bridesmaid attend a craft night in prep for the wedding! ;)

I'm so happy to be crossing this off of my to-do list, and adding it to my done list. I have about a million and one other projects I'd like to see magically move over to the done list! When is the proper amount of time before to start actually making things for the wedding? I have such a hard time making things for a space just from memory. I need to see and feel the space and make it accordingly. I guess I need to get over that hill though. Happy Tuesday! xo, Meghan

April 07, 2012

What we Wore: Handmade dresses!

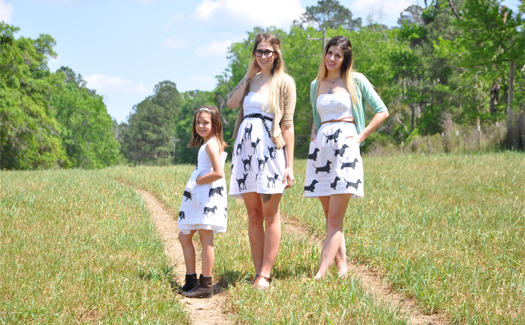
I am so excited to be sharing this with you today! When I saw this DIY I just knew that the Best Girls had to do it! I knew that Angela would want to do dachshunds in honor of her pup Daisy, and Audie would want to do horses because she loves horses! But me, I was having such a hard time committing to something. I thought I wanted to do pugs, feathers + teepees, sailboats, Ferris wheels, and deer. I finally settled on fawns, and I'm so glad I did. We had such a blast making these dresses, the only hard part was seeing them hang in our closets for 3 weeks before we could wear them! 

On Audrey:  Dress, Handmade + Target // Boots, her riding boots.
On Angela:  Dress, Handmade + Target // Sweater, Target // Belt, Forever 21 // Indian necklace + ring, Way Out West // Oxfords, Wanted
On Meghan: Dress, Handmade + Target // Glasses, Coastal.com // Sweater, Target // Belt, Ross // Owl necklace, birthday gift // Sandals, Walmart (a few years ago)

 and because it's that much more fun taking jumping pictures with an 8 year old....
Of any DIY or craft I've done because I saw it on a blog, or pinterest, this has been by far my favorite! It's something I can use and wear for a very long time, and it's completely unique! Next up on our list is studded shorts, be on the look out for those! Also, I just wanted to throw this out there...in these pictures it was pushing 90 degrees. In April. Today it's like 40 degrees. Is anyone else having weird weather changes? I'm hoping it doesn't last, because I put any sign of warmer clothes away 2 months ago! I hope you have the happiest of Saturdays! xo, Meghan + Angela

October 14, 2011

Fridays are for:

Hi and happy Friday! Today I spent most of the afternoon looking for the perfect pair of boots or shoes. This time next week Bean and I will be in Atlanta! It's part of his birthday present, and I'm so excited to go. Well, I had found the most lovely pair of oxfords at target and when I went back today to get them, they didn't have my size. I really like this particular pair because they are so light and don't have a thick heel. Anyway, I don't think they will be here in time for ATL if I were to order them today. But as I browsed the Target website, I realized that particular pair and many others are buy-one get-one. I'm thinking I'm going to go ahead and order them anyway. They are that cute.

Today's 'Fridays are for:' is chock full of pretty things you can make for yourself!

I am SO excited about this D.I.Y. Prepare to see my entire house full of transferred images. The possibilities are endless!

I've been wanting to do this forever! The entire process is listed and so helpful!

I have a lot of these old Samsonite suitcases sitting around, I think I need to pretty mine up

I don't know about you, but I love arrows + belts too. This DIY is perfect!

I was actually thinking about one of these the other day, then I found this fun D.I.Y
Oh and I just found Miss Indie's blog this week, fab!

Such a cute idea! I love wood grain, and I'm pretty savvy with felt, so I'm sure I'll be making some of these!

1//2//3//4//5//6

I hope you find something fun to make, maybe even this weekend. While the kiddos are napping. Happy crafting!

xo Meghan